Sponsored Ad

Sunday, May 6, 2012

Find Out if a Given Number is Divisible by 3 in C#

To check if number is divisible by 3 or not you have to use the mode operator and if reminder is 0 it means it is divisible.

Find Out if a Given Number is Divisible by 3 in C#

using System;

namespace ConsoleHub
{
    class Programs
    {       
        static void Main(string[] args)
            {

                Console.WriteLine("Enter a Number:");
                int intDiv3 = Convert.ToInt16( Console.ReadLine());
                if (intDiv3 % 3 == 0)
                {
                    Console.WriteLine("The Number {0} is Divisible by 3", intDiv3);
                }
                else
                {
                    Console.WriteLine("The Number {0} is NOT Divisible by 3", intDiv3);
                }

                Console.ReadLine();
            }       
    }   
}

Return Object of a Class from a Function in C#

You can return a object of a class from a method. This is simple program which is returning the object of share class. You can see that the class variable value is also returning.

Return Object of a Class from a Function in C#

using System;

namespace ConsoleHub
{
    class Share
    {
        public int ShareNumber = 299;
    }
    class Programs
    {       
        static void Main(string[] args)
            {
                Share ObjS = ObjFactory(); 

                Console.WriteLine("The Return Object is: ");
               Console.WriteLine(ObjS.ToString());
            Console.WriteLine(ObjS.ShareNumber);

                Console.ReadLine();
            }

            static Share ObjFactory()
            {
                Share objShare = new Share();
                objShare.ShareNumber = 201;
                return objShare;
            }       
    }   
}

Return an Array from a Method in C#

This program is a example of returning an integer array from a method. Create an integer array in the function and return it. Remember that the function return type should be array of integer.

Return an Array from a Method in C#

using System;

namespace ConsoleHub
{
    class Programs
    {       
        static void Main(string[] args)
            {
                int[] ReturnArray = ArrayFactory();

                Console.WriteLine("The Return Array is: ");
                foreach (int d in ReturnArray)
                {
                    Console.Write(" {0}", d);
                }

                Console.ReadLine();
            }

            static int[] ArrayFactory()
            {
                int[] NumberQueue = { 5, 6, 3, 8, 9 };
                return NumberQueue;
            }       
    }
}

C# Program to Pass int into a Function by Reference

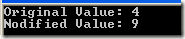
This program help you to pass int value by reference and when you pass a value you can modify it inside function only. As you can see the output is 5 more than the privious value.

C# Program to Pass int into a Function by Reference

using System;

namespace ConsoleHub
{
    class Programs
    {       
        static void Main(string[] args)
            {
                int Org_Value = 4;
                Console.WriteLine("Original Value: {0}", Org_Value);
                Add5(ref Org_Value);
                Console.WriteLine("Modified Value: {0}", Org_Value);

                Console.ReadLine();
            }

            static void Add5(ref int intValue)
            {
               intValue = intValue + 5;
            }       
    }
}

Example to Use Class Inside Another Class in C#

You can have a class inside another class (nested class). The example of nested class is given below. The program also tells that how to use each class variable and create object of each class.

The full syntax of nested class is written below.

Incase of any questions, comment below.

Example to Use Class Inside Another Class in C#

using System;

namespace ConsoleHub
{
    class Programs
    {
        string strPrograms = "Prgram class string.";
        class SubClass
        {
            string strSubClass = "SubClass class string.";

            static void Main(string[] args)
            {
                ConsoleHub.Programs objPrograms = new ConsoleHub.Programs();
                ConsoleHub.Programs.SubClass objSubClass = new ConsoleHub.Programs.SubClass();

                Console.WriteLine("The value of Programs Class Variable is: {0}", objPrograms.strPrograms);
                Console.WriteLine("The value of SubClass Class Variable is: {0}", objSubClass.strSubClass);

                Console.ReadLine();

            }
        }
    }
}

Write Two Nested Namespaces in C#

You can write the nested namespaces in C#. The nested namespaces provide more facility to organize your classes and code. This program is a example of nested namespace and creating an object of class and using the class level variable.

Write Two Nested Namespaces in C#

using System;

namespace ConsoleHub
{
    namespace Innner_NameSpace
    {
        class Programs
        {
            int ClassVar = 1;
            static void Main(string[] args)
            {
                ConsoleHub.Innner_NameSpace.Programs ObjPrograms = new ConsoleHub.Innner_NameSpace.Programs();
                ObjPrograms.ClassVar = 5;

                Console.WriteLine("The value of Class Variable is {0}", ObjPrograms.ClassVar);

                Console.ReadLine();

            }
        }
    }
}

How to Throw and Handle ArgumentException in C#

This program demonstrate the throwing a new exception of type ArgumentException. Just create a new exception and through it. to catch this type of specific exception specify in catch block.

How to Throw and Handle ArgumentException in C#

using System;

namespace ConsoleHub
{
    class Programs
    {
        static void Main(string[] args)
        {
            try
            {
                Print_String(null);
            }
            catch (System.ArgumentException ex)
            {
                Console.WriteLine("{0}", ex.Message);
            }
            Console.ReadLine();
        }

        private static void Print_String(string str)
        {
            if (str == null)
            {
                throw new ArgumentNullException("str");
            }
            else
            {
            Console.WriteLine(str);
            }
        }
    }
}

Saturday, May 5, 2012

Char Array with foreach Loop in C#

This C# program is create a char array and then print the char array values using the foreach loop. The foreach loop start with first value of array and then iterate with all the values. The limitation of foreach that you can not update the array values.

Char Array with foreach Loop in C#

using System;

namespace ConsoleHub
{
    class Programs
    {
        static void Main(string[] args)
        {
            char[] CharArray = { 'm', 'n', 'o', 'p', 'q' };

            foreach (char ch in CharArray)
                Console.Write("->{0} ", ch);

            Console.ReadLine();
        }
    }
}

Initialize Char Array and Print in C#

The below program will help you to initialize the char array. While defining the array you can pass the set of value to directly initialize it. The for loop is used here to print the char array values.

Initialize Char Array and Print in C#

using System;

namespace ConsoleHub
{
    class Programs
    {
        static void Main(string[] args)
        {
            char[] CharArray = { 'A', 'B', 'C', 'D', 'E' };

            for (int i = 0; i < CharArray.Length; i++)
                Console.Write(" {0}", CharArray[i]);         

            Console.ReadLine();
        }
    }
}

Initialize a String Variable in C#

This program is showing different methods of initializing the given string variable.

Case 1 is about initializing the string variable with empty string

Case 2 is about initializing the string variable with null string

Case 3 is about initializing the string variable with a value string

image

using System;

namespace ConsoleLab
{
    class Programs
    {
        static void Main(string[] args)
        {
            //Initialize with empty string
            string EmptyString = "";
            //Initialize with null string
            string NullString = null;
            //Initialize with a value string
            string ValueString = "Sample";

            Console.WriteLine("Empty String: {0}", EmptyString);
            Console.WriteLine("Null String: {0}", NullString);
            Console.WriteLine("Value String: {0}", ValueString);

            Console.ReadLine();
        }
    }
}

Friday, April 27, 2012

Natural Number (0 to 10) Series and Series Sum in C#

Do you want to print natural number series and also want to print the sum . Actually it is formula based but if you want to print series also then you have to go with for loop. the program is given below.

If you feel any difficulty while running or understanding the below program, then feel free to comment.

Natural Number (0 to 10) Series and Series Sum in C#

using System;

namespace ConsoleHub
{
    class Programs
    {
        static void Main(string[] args)
        {
            string strSeries = "0";
            int sum = 0;
            for (int i = 0; i <= 10; i++)
            {
                if (i.ToString() != "0")
                {
                    strSeries = strSeries + "+" + i;
                }
                sum = sum + i;

            }
            Console.WriteLine("{0}={1}", strSeries, sum);

            Console.ReadLine();
        }
    }
}

Sunday, July 24, 2011

Publish and Deploy Code using Visual Studio

Visual studio provide very easy and good feature to publish ad deploy the code  and dlls. Follow the below steps to deploy and publish:

Step 1: Right click on project and select the publish option

Publish and Deploy Code using Visual Studio

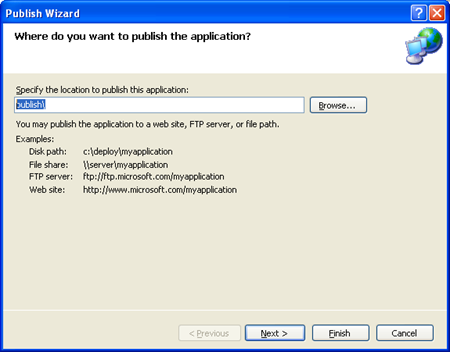
Step 2: Select the Directory where you want to publish

There is 4 kind of location

  1. Disk Path
  2. File Share
  3. FTP Server
  4. Web site

Select as per your requirement.

Publish and Deploy Code using Visual Studio

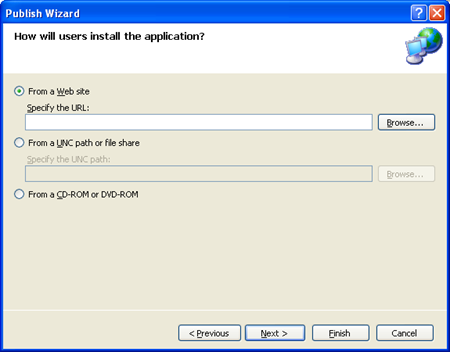
Step 3: Select How user will install applcation

Publish and Deploy Code using Visual Studio

Step 4: Select option for application to check for updates.

Publish and Deploy Code using Visual Studio

Step 5: Click on Finish and publish the solution.

Publish and Deploy Code using Visual Studio

Search/Replace Text in Entire Solution by using Visual Studio Search

Visual studio provide different kind of search to find text in file(s) or selected File(s). The search available with VS are:

  1. Quick Find
  2. Quick Replace
  3. Find in files
  4. Replace in Files
  5. Find Symbols

You do any of the above search in visual studio.

To do the search in entire solution Go to Edit Menu –> Find and Replace –> Find in Files

Search/Replace Text in Entire Solution by using Visual Studio Search

Find in Files Search:

Search/Replace Text in Entire Solution by using Visual Studio Search 

Shortcut key to Find in Files : CTRL + SHIFT + F

How to Format Selected Source Code in Visual Studio Editor

Visual studio provide a very good functionality to format your source code automatically. If you code is not well formatted don't worry. just by a single click you can align all code. follow the below steps to do that.

Step 1: Go to Edit menu option

Step 2: Select Advanced and then select Format Document

Step 3: There is another option Format  Selection under Advanced , Please not that this is applicable for selected text only, so first select the option and then click on this option.

Shortcut keys for above functionality:

Format Document CTRL + E + D

Format  Selection CTRL + E + F

How to Format Selected Source Code in Visual Studio Editor

How to Change Font and Color of Visual Studio Editor

Visual studio provide a setting to change change font and color of text and other things available at editor. To change the look and feel follow the below steps:

Step 1: Click on Tools menu from visual studio IDE.

Step 2: Select Options from Tools menu.

Step 3: Select Environment and then select Fonts & Colors option

From the Fonts & Colors page you can change the font and color of different elements.

for example selected text, line number , book mark etc.

How to Change Font and Color of Visual Studio Editor

After changing the text color to red you can see that editor is showing normal text in red.

How to Change Font and Color of Visual Studio Editor

How to Edit Readonly File and Warn when Save in Visual Studio

Visual studio provide a option to allow editing of read only files. and if option is enable it will also display a message to override it. To enable disable read-only file option follow the below steps.

Step 1: Open Visual Studio – > Click On Tools menu

Step 2: Select Options

Step 3: Click on Environments  and then select Documents

Step 4: Under Documents page select/unselect “Allow editing of read-only files; warn when attempt to save” checkbox.

How to Edit Readonly File and Warn when Save in Visual Studio

Read only file save warning.

How to Edit Readonly File and Warn when Save in Visual Studio

Enable/Disable Visual Studio Notification When File is Changed from Outside

If a file which is already open in visual studio and is changed from outside of visual studio environment. The visual studio have a setting to tell you that file is changed and you want to reload this file or not.

if you click on yes it will reload the file otherwise will have old version of file.

Follow the below steps to enable/disable this setting.

Go to Tools –> Options –>  Environments –> Documents

and Enable disable Detect when file is changed outside the environment Checkbox.

Enable/Disable Visual Studio Notification When File is Changed from Outside

If you select the Auto-Load Changes if Saved , The visual studio will automatically reload the file.

Enable/Disable Visual Studio Notification When File is Changed from Outside

Saturday, July 23, 2011

Display/Show Toolbox in Visual Studio + Shortcut Key

To display Toolbox in Visual studio IDE, Follow the below steps:

Step 1. Go to View menu

Step 2: Click on Toolbox option,  the toolbox will appear in left hand side of visual studio.

Display/Show Toolbox in Visual Studio + Shortcut Key

There is keyboard shortcut  also to display toolbox

Press CTRL key + W + X from keyboard

How to Open/Display Solution Explorer in Visual Studio | Shortcut key

This post is to help, who are new to visual studio. If you closed the solution explorer from visual studio IDE. you can follow the following steps to display again:

Step 1: Go to View menu

Step 2: Click on Solution Explorer Option 

How to Open/Display Solution Explorer in Visual Studio | Shortcut key

Shortcut keys to open solution explorer:

Press  CTRL + W + S key to open solution explorer

Visual Studio Settings: How to Enable Word Wrap

The below steps will help you to enable word wrap in visual studio.

Step 1: Go Tools menu

Step 2: Click on Options

Step 3: Select The Text Editor and then select your language or All Language for All

Step 4: Select General and then go to settings option

Step 5: Select the Word Wrap option and click on save.

Tools –> Options –> Text Editor –> C# or All Language –> General –> Settings –> Check Word Wrap Option

How to Enable Word Wrap in Visual Studio Editor

Note : there is a option to show visual glips for word wrap, if you enable this you will get the visual indicator like below:

How to Enable Word Wrap in Visual Studio Editor

Sponsored Ad

Development Updates